
Why data cleaning always takes longer than expected

Raw imported data rarely arrives clean — inconsistencies accumulate across every source and export
Whether you're pulling data from a CRM export, a finance system, a database dump, or rows copied from a web page, the data almost never arrives in a consistent, analysis-ready state. Names have extra spaces. Dates are in three different formats. Duplicates crept in during the export. Some columns are in ALL CAPS and others aren't. Blank rows are scattered throughout.
These problems don't look serious in isolation, but they compound quickly. A VLOOKUP fails because one value has a trailing space and the other doesn't. A pivot table double-counts because "London" and "london" are treated as different entries. A date comparison breaks because half the column is text strings and the other half is actual date values.
Data cleaning is the step most people underestimate. It's not glamorous, it's not analytical, and it doesn't produce any insight on its own — but skipping it or doing it poorly corrupts every result that follows.
Here's a practical breakdown of the most common problems and how to fix each one in Excel — both manually with formulas and with faster automated approaches.
The most common data quality problems
Most messy datasets suffer from a predictable set of issues. Recognising them quickly saves time — you can go straight to the right fix rather than hunting for why a formula is breaking.
Extra spaces
Leading, trailing, or multiple internal spaces — invisible but breaks lookups and comparisons.
Duplicates
Repeated rows from merged exports, copy-paste errors, or system quirks.
Inconsistent capitalisation
"SMITH", "Smith", and "smith" are treated as different values in formulas and filters.
Mixed date formats
DD/MM/YYYY in some rows, MM/DD/YYYY in others, text strings in others — Excel can't compare them reliably.
Blank rows and cells
Empty rows interrupt ranges and confuse pivot tables, VLOOKUP, and sort operations.
Numbers stored as text
A column that looks like numbers but has a green triangle in the corner — SUM and AVERAGE will ignore them.
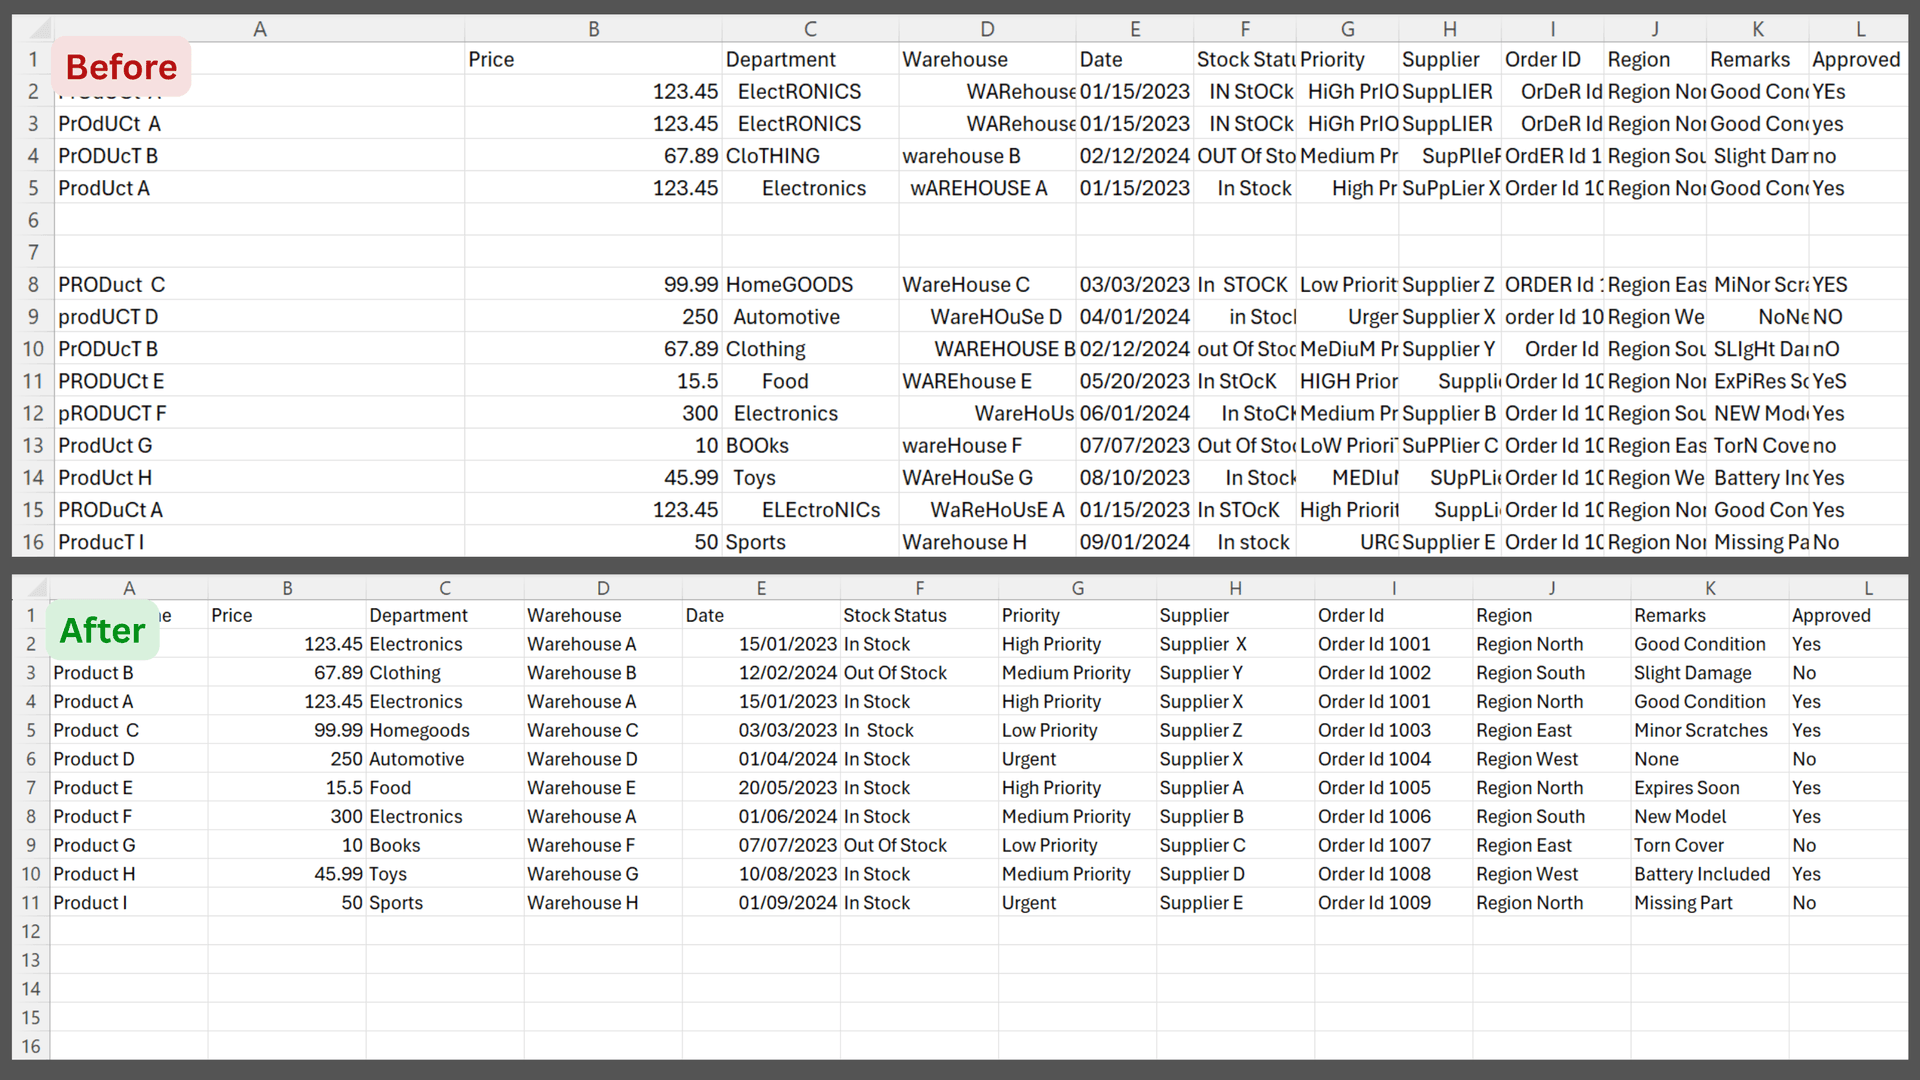
The same dataset before and after cleaning — spaces, duplicates, and inconsistent formatting resolved
Fixing extra spaces with TRIM
Extra spaces are the most common and most invisible data problem. A cell containing " London" and one containing "London" look identical to the eye but are completely different values to Excel. VLOOKUP returns an error. COUNTIF misses matches. Pivot table groups them separately.
The TRIM function removes all leading and trailing spaces, and collapses multiple internal spaces down to one:
=TRIM(A2)Apply this in a helper column alongside your data. Once you're satisfied, copy the helper column, paste as Values Only back over the original, and delete the helper column. This converts the formulas to clean static text.
For data that came from a web scrape or external system, there are sometimes non-breaking spaces (character code 160) that TRIM alone won't catch. The combined formula handles both:
=TRIM(SUBSTITUTE(A2, CHAR(160), " "))Finding and removing duplicates
Duplicate rows are common in datasets merged from multiple sources — the same customer appearing in two exports, the same transaction logged twice, overlapping date ranges in different pulls.
Excel's built-in tool handles this directly. Select your data range, then go to:
Data → Remove Duplicates
A dialog lets you choose which columns to consider when identifying duplicates. Tick all columns for exact-row duplicates, or select specific columns if you want to deduplicate by a key field (e.g., customer ID) while keeping the first occurrence.
If you want to identify duplicates before removing them, COUNTIF flags them in a helper column:
=COUNTIF($A$2:$A$100, A2)Any value greater than 1 is a duplicate. Filter on that column to review which rows are repeated before deciding what to keep.
Fixing inconsistent capitalisation
Text case inconsistencies are particularly common in data that has been entered manually by multiple people over time — some rows in title case, others in uppercase, others in whatever case someone happened to type. Excel treats these as different values by default, breaking groupings in pivot tables and exact-match lookups.
Excel has three dedicated functions for this:
=PROPER(A2)Title Case — capitalises the first letter of each word. Best for names and places.
=UPPER(A2)ALL CAPS — useful for codes, IDs, and standardised reference fields.
=LOWER(A2)all lowercase — useful for email addresses and system identifiers.
As with TRIM, apply these in a helper column, then paste as values over the original once the output looks right.
Standardising dates
Date formatting is one of the messiest data problems to fix manually, mainly because Excel's behaviour depends on whether it interpreted a value as a date or a text string when it was imported. A column that looks like dates may be entirely text, partially text, or a mix — and each scenario requires a different approach.
First: check whether Excel sees them as dates
For real date values, reformatting is straightforward: select the column, press Ctrl+1 to open Format Cells, and choose your preferred date format under the Number tab.
For text strings that look like dates, the DATEVALUE function converts them to real date serial numbers that Excel can work with:
=DATEVALUE(A2)The result is a number — format the output column as a date to display it correctly. If DATEVALUE returns an error, the string format isn't one Excel recognises automatically, and you may need to use MID, LEFT, and RIGHT to extract the day, month, and year components and reconstruct the date:
=DATE(RIGHT(A2,4), MID(A2,4,2), LEFT(A2,2))This example assumes DD/MM/YYYY text strings. Adjust the positions for other formats. Once you have clean date values, use the TEXT function to display them in a consistent format:
=TEXT(B2,"DD/MM/YYYY")Removing blank rows and cells
Blank rows interrupt Excel ranges in ways that break formulas, pivot tables, and sort operations. They're most common in data exported from systems that add separator rows, or in manually maintained spreadsheets where rows were deleted rather than cleared.
The quickest way to remove blank rows in Excel:
- 1Select the entire data range.
- 2Press Ctrl+G (Go To) → Special → Blanks. This selects every empty cell in the range.
- 3Right-click any selected cell → Delete → Entire Row.
For blank cells in the middle of a dataset (rather than whole blank rows), the same approach works — select the range, Go To Special → Blanks, then either delete or fill with a placeholder value.
When to use a macro instead
Every technique above works — but doing them in sequence on a new dataset is genuinely tedious. You add a helper column for TRIM, another for PROPER, convert them to values, delete the helpers, run Remove Duplicates, hunt down blank rows, fix the dates. If you clean data regularly, you spend more time on the process than on the actual analysis.
This is exactly the scenario where a macro earns its place. A VBA macro can run all of those steps in sequence on any dataset, in seconds, without you doing anything except clicking a button. The logic is the same as the manual approach — it's just automated and repeatable.
When manual makes sense
When a macro makes sense
Writing a VBA macro from scratch requires some knowledge of Excel's object model and the VBA language. If you're comfortable with that, the built-in macro recorder can capture simple steps, and the VBA editor gives you full control to extend them.
If you'd rather skip the VBA entirely, the Excel Data Cleaner is a ready-made macro workbook that handles all of the above — trim, duplicates, capitalisation, date standardisation, blank removal, and column auto-fit — each as an individual button or all at once with Clean All. Paste your data in, click the button, and the cleaned data is ready. No formula columns, no helper sheets, no VBA knowledge required.
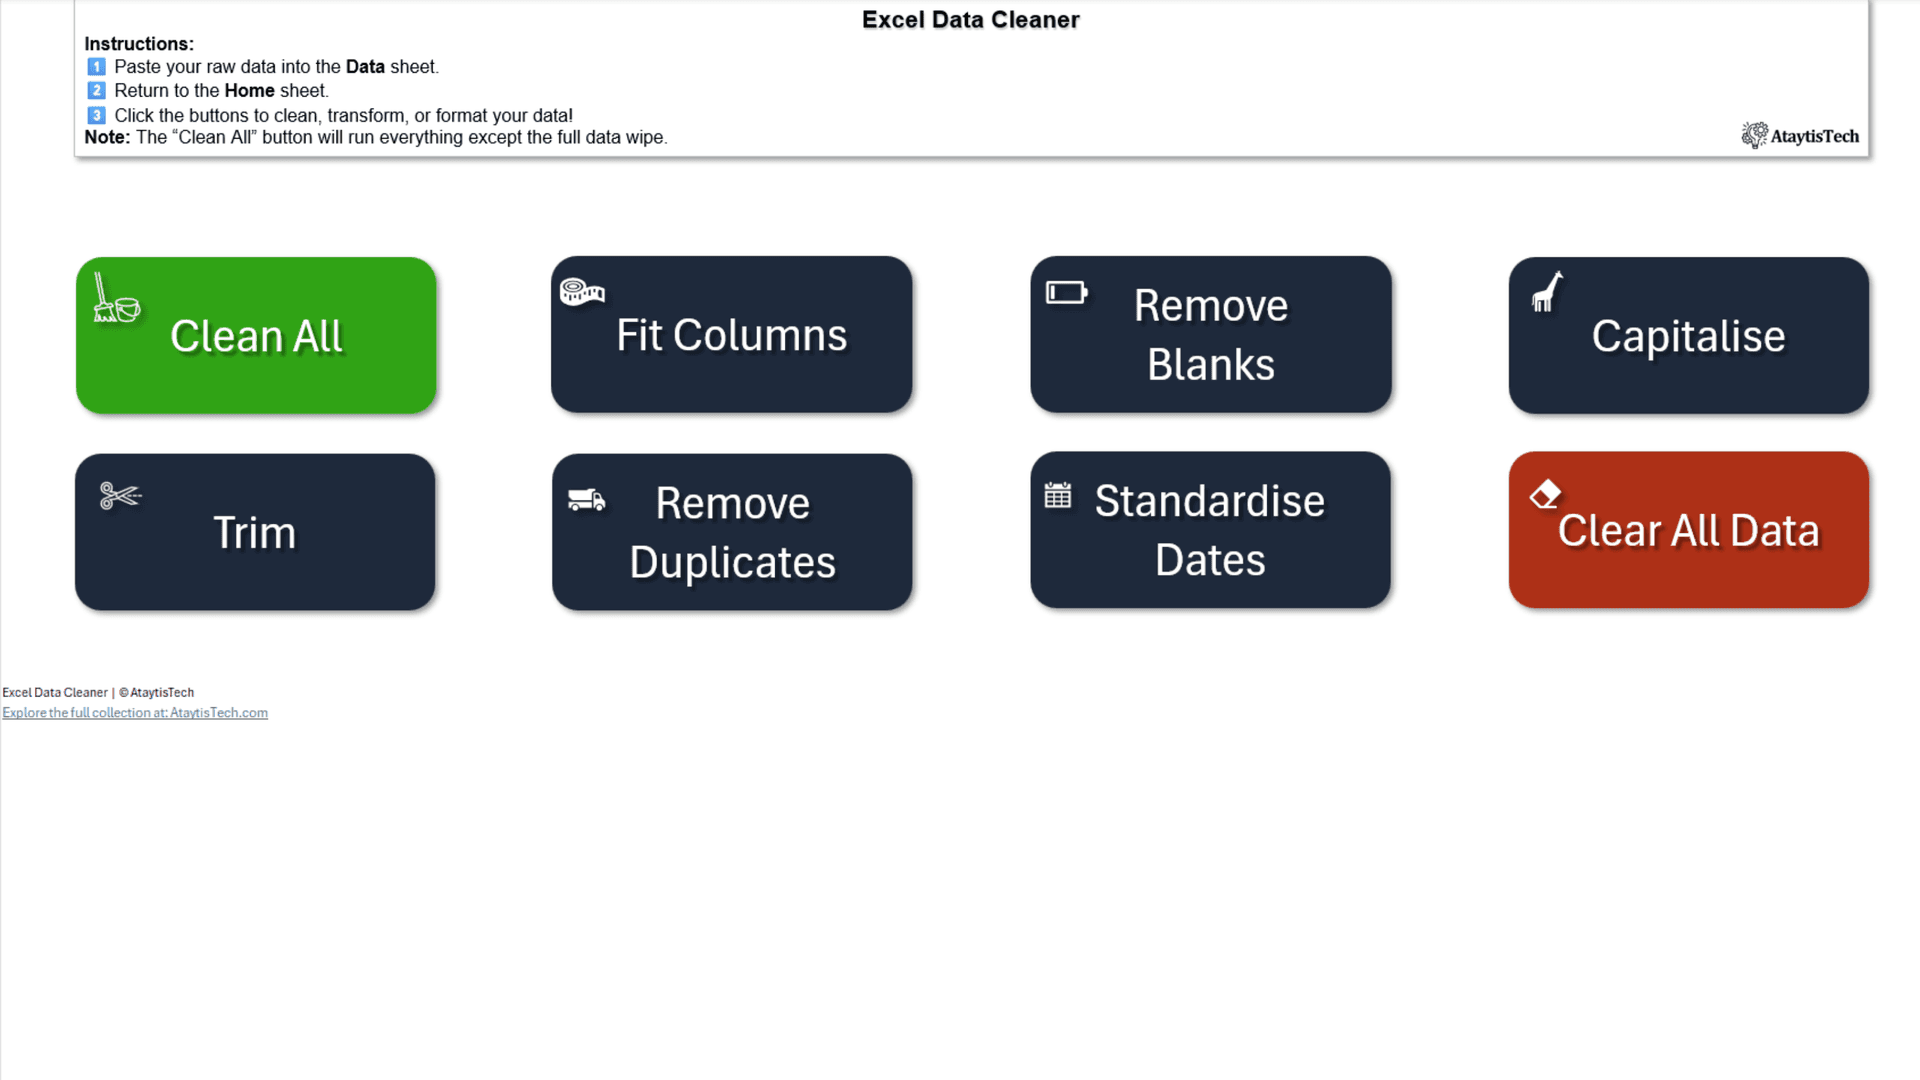
The Excel Data Cleaner — each cleanup step available individually or all at once with Clean All
Practical tips for cleaner data workflows
A few habits that make data cleaning faster and less error-prone over time:
Always work on a copy
Before cleaning any dataset, save a copy of the original file. Cleaning operations — especially Remove Duplicates and macro-based steps — are difficult to reverse once applied. A backup takes ten seconds and has saved hours of re-work.
Clean before you analyse, not after
It is tempting to start building a pivot table or writing VLOOKUPs and fix problems as they appear. In practice this leads to fixing the same issue in multiple places. Clean the source data first, then build the analysis on top of it.
Document what you changed
If you are cleaning data that other people will use or that you will need to reproduce, keep a simple note of what steps you applied. This is especially useful when the same export arrives monthly and you need to apply the same cleaning routine.
Check row counts before and after
Note the number of rows before you start and after each significant step (duplicate removal especially). An unexpected drop in row count is worth investigating — you may have removed rows you intended to keep.
Validate key columns after cleaning
After cleaning, run a quick check on your most important columns: use COUNTBLANK to check for remaining empty cells, COUNTIF to check for remaining duplicates, and MIN/MAX on date columns to confirm the range looks reasonable.
Skip the manual steps
Trim, deduplicate, fix capitalisation, standardise dates, and remove blanks — all in one click, no formulas required.
One-time purchase · Instant download · Includes PDF guide